PoE2 Architect Spawn Locations: How to Reach the Middle Route
A practical route guide for reading Architect positions, protecting the central path, and deciding whether a Royal Access Chamber line is worth the rooms it consumes.
About the editorial team
PoE2 Temple Planner Editorial Team
Editorial team
The PoE2 Temple Planner editorial team prepares practical Temple guides from the site's room data, linked official patch notes, and clearly identified community context.
Editorial standard
This page explains route decisions using the planner's connection model. In-game room offers and future patches can change the best line, so treat fixed coordinates as a planning aid rather than a guarantee.
On this page
The short version
Treat PoE2 architect spawn locations as route decisions, not a magic square. Start from the entrance, keep the central connection open, and test the room chain before spending upgrades on a specialist branch.
Fast answer: how do you reach the middle in PoE2 Temple?
No universal coordinate forces the Architect or the same room offer. Preserve a connected entrance path, keep the central junction flexible, and compare the route with your actual offers.
| Situation | Best first move | Why it matters |
|---|---|---|
| You need the central route | Keep a flexible path tile | It preserves legal connections while the next room is unknown. |
| Royal Access Chamber is offered | Check the surrounding chain | A destination is useless if the route behind it breaks. |
| A connection is blocked | Bridge it with a side room or path tile | A short detour can protect access. |
| You want a high-tier room | Build the support chain first | Tier value depends on reachable neighbors and upgrades. |
What Architect position means in a Temple plan
When players search for PoE2 architect spawn locations, they are usually trying to solve one of two problems: an Architect seems to be on the wrong side of the Temple, or a promising room cannot be reached without breaking the main route. The useful answer is not a memorized coordinate. It is a way to read the map so that the next room can still connect to the center.
| Signal | What to look for | What it tells you |
|---|---|---|
| Reachability | Every important room has a connected path to the entrance | The route is usable, not just visually close. |
| Central flexibility | The middle still has an open path or more than one legal continuation | You can react to the next room offer. |
| Support alignment | Generator, Golem Works, Thaumaturge, or another support room is near the intended chain | The route can become an upgrade plan instead of a single-room detour. |
| Low repair cost | You do not need several sacrifices or forced side branches | The Architect goal fits the rest of the Temple. |
How to read PoE2 architect spawn locations from the route
Read the Temple from the entrance outward. First mark the rooms you can reach without relying on a future upgrade. Then identify the nearest central junction where a path tile, Generator, or compatible room can keep two directions open. Only after that should you decide whether the Architect line is a priority or merely a side reward.
- Mark the entrance and the rooms that are already connected to it.
- Circle the middle junction that can accept the most useful next connection.
- Separate guaranteed path tiles from rooms that need a specific neighbor or upgrade condition.
- Check the destination room and the support rooms as one chain, not as isolated squares.
- Leave one fallback branch until the next room offer confirms the direction.
Count connections, not visual distance. A nearby room can be unreachable when its room type has no legal bridge; a farther room may be safer if a path tile or support room keeps the route open. The middle is valuable because it preserves options while the Temple is revealed.
How to get the Architect to the middle route in PoE2
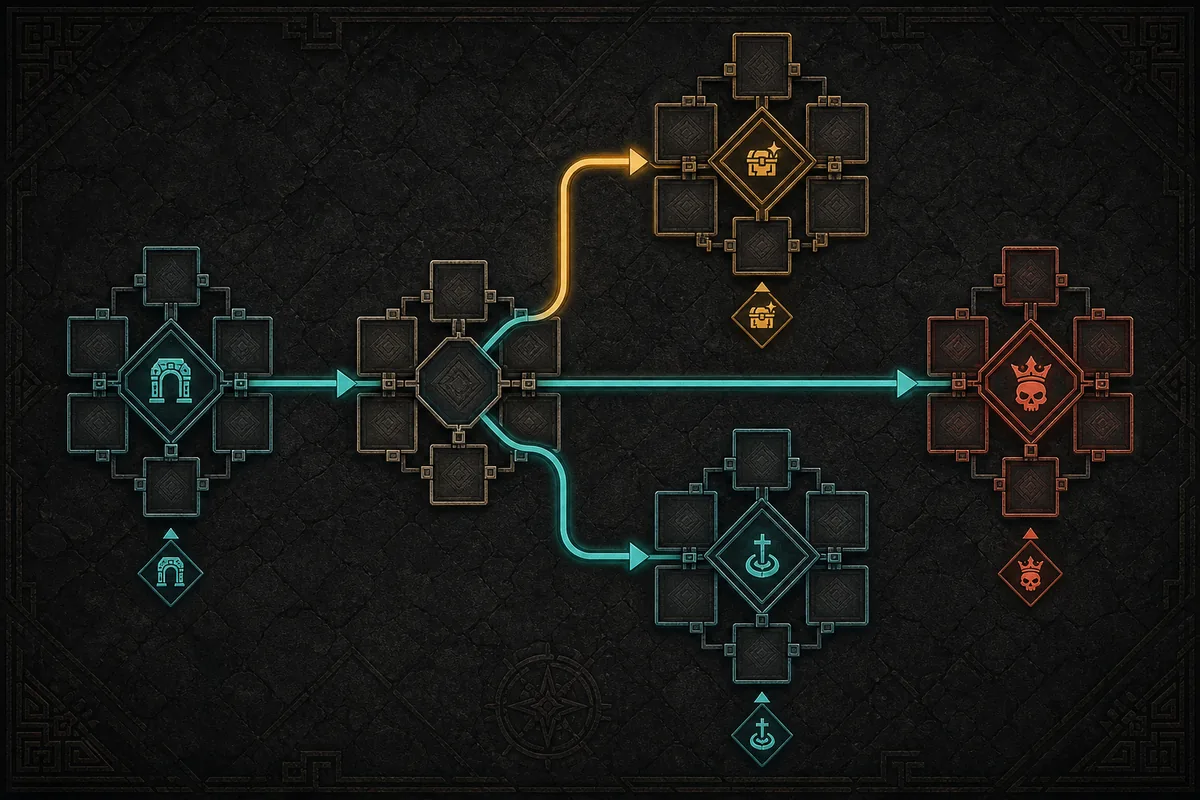
To move an Architect goal toward the middle, protect the feeding route before optimizing the final room. Use a path tile when it preserves several legal directions, or a support room that also advances the upgrade chain. Do not fill the central square with a dead end unless the reward justifies closing the branch.
The planner checks reachability after ordinary connections, blocked bridges, room-specific neighbors, and upgrade adjacency rules are applied. That is safer than copying a fixed layout built from different room offers.
A middle position is not a guarantee
Use the central route as a flexible planning target. It does not guarantee an Architect spawn, a particular room offer, or a fixed reward. Recheck the live Temple after every important room decision.
Royal Access Chamber: when the destination is worth the route
Royal Access Chamber can look more important than the path that reaches it. Ask whether it protects your main Temple goal or forces you to abandon a stronger chain; a longer line with Generator coverage may beat a direct dead end.
Inspect both sides of the intended connection before committing. Adjacency, required neighbors, and path tiles can determine whether the chain remains usable. If the chamber needs a future offer, keep a fallback tile.
| Question | Keep the route | Delay or skip |
|---|---|---|
| Does it preserve the primary goal? | It leads toward boss, currency, or progression value you already selected | It pulls the Temple into a new goal with no support. |
| Can the entrance still reach it? | The path remains connected after special room rules | A blocked bridge or dead end cuts off the destination. |
| Are support rooms nearby? | Generator, Golem Works, or another useful support chain is reachable | The chamber consumes the central space and strands the support rooms. |
| What is the repair cost? | One flexible placement solves the route | Several forced choices or sacrifices are needed. |
Room upgrade chains that make the route matter
An Architect route is strongest when it supports a coherent upgrade chain. Current room data shows the pattern: Smithy wants Workshop or Generator neighbors, while Golem Works uses adjacent Generators. A destination without support is not a finished plan.
For broad loot, stabilize the connection before chasing a late tier. For XP, keep the path and density realistic for the character. For specialist goals, protect the relevant Thaumaturge, Corruption Chamber, Sacrificial Chamber, or support room.
| Route goal | Rooms to watch | Planning question |
|---|---|---|
| Broad loot | Smithy, Alchemy Lab, Generator | Can the reward rooms stay connected while support coverage grows? |
| Experience | Synthflesh Lab, Garrison, Generator | Can the route support density without isolating the entrance? |
| Corruption | Corruption Chamber, Thaumaturge, Sacrificial Chamber | Does the specialist chain justify using the central junction? |
| Flexible progression | Path tile, one value room, one support room | Can you pivot after the next offer? |
A five-step workflow for Architect route planning
Use the live planner as a decision log: test the route you can build, then compare the destination with what you give up elsewhere.
- Open the planner and place the entrance path or the rooms that are already known.
- Switch to the connection-aware view and inspect which neighboring placements are legal.
- Place a flexible middle path before locking in a specialist room when the next offer is unknown.
- Select important rooms to read their tier and adjacency hints; check Generator coverage before late upgrades.
- Save or export the plan after the route reaches the intended destination, then keep a fallback version for a different room offer.
If the route fails, remove the least important side branch, restore a path tile, and test again. A stable, less ambitious Temple is usually better than a fragile line that only looks perfect on paper.
Open the PoE2 Vaal Temple planner
Test adjacency, tiers, Generator coverage, and alternate routes.
Use the Temple cheat sheet
Check room effects and upgrade chains.
Read the full Temple guide
Review the wider Temple system.
Common mistakes with Architect spawn locations
- Treating a fixed coordinate as a guarantee across every Temple state.
- Choosing a destination room before checking whether the entrance can still reach it.
- Filling the central junction too early and losing the ability to react to the next offer.
- Counting visual distance instead of checking room-specific connection rules.
- Ignoring support rooms until after the specialist room is already isolated.
- Assuming a high tier is valuable even when the route cannot support the surrounding chain.
Separate three questions: where the Architect appears, whether the route can reach that area, and whether the destination improves your goal. The first may vary by run; the second is testable; the third is strategy. This prevents a location search from becoming a fragile one-room chase.
Best default for uncertain offers
Keep one flexible path through the middle, preserve the entrance connection, and postpone luxury upgrades until the destination and support chain are both visible.
Frequently asked questions
References and update context
Room names and connection terminology can change with updates. These links provide source context; recommendations remain editorial guidance.
- PoE2DB: Temple of Atziri - Room names, effects, and upgrade terminology.
- Path of Exile 2 patch notes 0.5.3 - Official Temple currency-source and Biome Restricted Room changes.
- Path of Exile 2 patch notes 0.5.4 - Official update adding Orb of Sacrifice rewards to Atziri's Vault.
- Path of Exile 2 0.5.5 Hotfix 8 - Official hotfix reference for the current 0.5.5 update line.
- PoE2 Temple Planner - Test the route against your current rooms.
How this guide was prepared
PoE2 Temple Planner Editorial Team
This article separates route mechanics from strategy preference and turns the planner's current adjacency model into a checklist that can be re-tested after room offers or patches change.
Test your Architect route before you commit
Sketch the entrance, protect the middle, and compare the Royal Access Chamber line with a fallback chain.