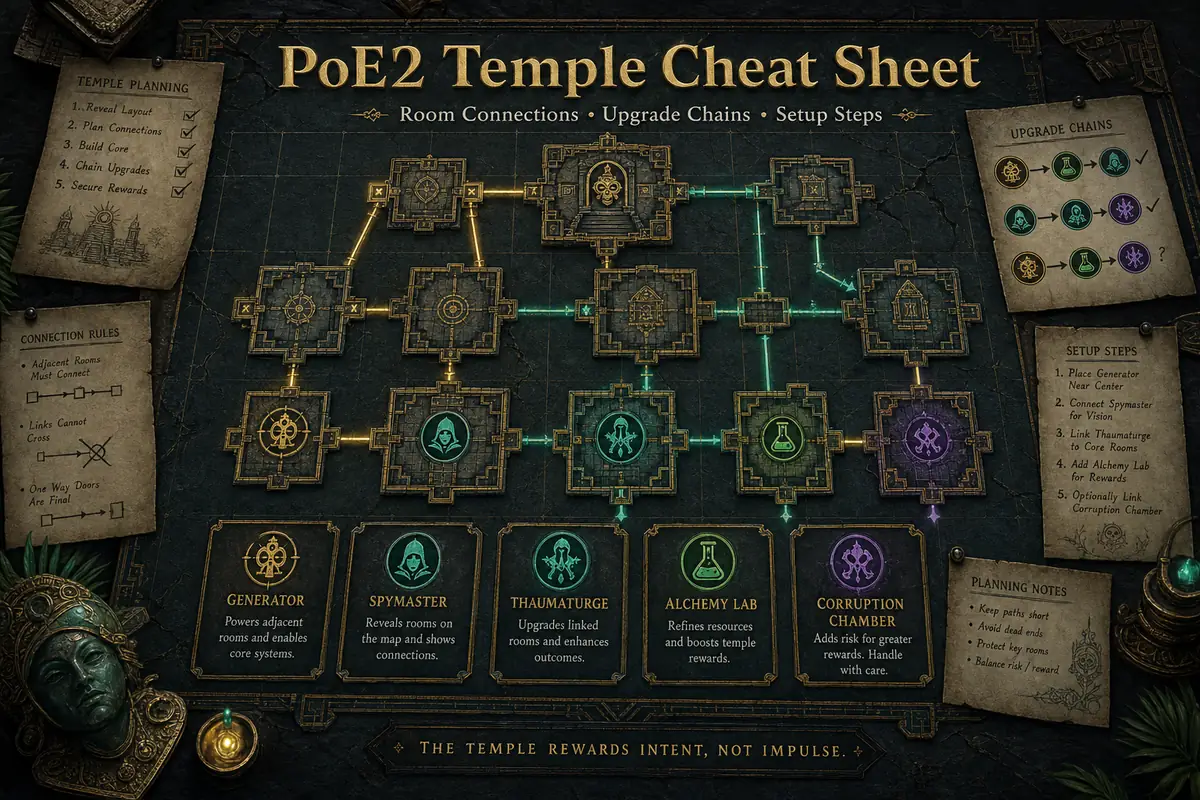
PoE2 Temple Cheat Sheet: Rooms, Connections & Upgrades
A fast reference for players who want to build a clean Atziri Temple without rereading a full guide every time: check the room chain, confirm support rooms, then test the layout in the planner.
Written by
Elena Marlowe
ARPG editor and systems writer at PoE2 Temple Planner
Elena writes practical Temple planning articles focused on decisions players can actually use mid-run, especially room priority, pathing, and upgrade-chain tradeoffs.
Editorial standard
This cheat sheet was built from current PoE2DB Temple room data, official Path of Exile patch notes, the site's planner logic, and SERP research showing that players need a faster room-connection reference than a full long-form guide.
On this page
Search intent and page focus
This page targets informational and quick-reference searches such as PoE2 Temple cheat sheet, PoE2 Temple room connections, PoE2 Temple setup, and how to set up Temple PoE2. Existing pages already cover the interactive planner, the complete guide, and best layouts, so this article stays focused on fast lookup tables and setup decisions.
Quick PoE2 Temple cheat sheet
If you only have a few seconds before choosing a room, use this short version. A good Temple is usually decided by three checks: can the room be reached, can it be upgraded, and does it belong to the same support chain as the rest of your plan?
| Decision | Fast Rule | Why It Matters |
|---|---|---|
| First support room | Place or protect Generator early | Generator coverage enables several important upgrade lines and keeps the setup flexible |
| Best general value chain | Smithy, Alchemy Lab, Spymaster, Thaumaturge | This keeps loot value broad instead of relying on one perfect specialist payoff |
| Best XP chain | Synthflesh Lab, Garrison, Workshop, Generator | XP scaling needs both experience bonuses and enough monster flow to feel meaningful |
| Best specialist chain | Corruption Chamber, Sacrificial Chamber, Thaumaturge | Corruption value is strongest when the surrounding Temple supports that narrower goal |
| Beginner safety rule | Secure access before chasing Tier 3 | An unreachable premium room is weaker than a reachable Tier 2 room that fits your goal |
How to read this cheat sheet before you open the planner
The fastest way to use a PoE2 Temple cheat sheet is not to memorize every room. Start with the purpose of the run. If the run is for trade value, look for broad loot rooms and scaling support. If the run is for leveling, look for density and XP support. If the run is for corruption or boss value, accept that the chain is narrower and needs cleaner support.
This matters because many Temple mistakes start from treating every good room as equally good in every temple. A room can be powerful in one setup and awkward in another. The real question is whether the room connects to your path, whether it can be upgraded with the support rooms you already have, and whether it improves the outcome you actually want.
- Pick one primary goal for the Temple: loot, XP, boss value, corruption, or balanced progression.
- Identify the support chain that goal needs instead of collecting random high-value rooms.
- Check reachability before upgrade ambition.
- Use the planner to test whether the room path and support coverage survive real placement rules.
- Only chase luxury Tier 3 upgrades after the core path is stable.
Practical shortcut
If you cannot explain why a room belongs in your Temple in one sentence, do not build around it yet. Put it in the planner first and check whether it supports the same goal as the rest of the layout.
PoE2 Temple room connections and support table
Use this table as the main quick-reference section. It is intentionally practical rather than encyclopedic: the goal is to tell you what each room is trying to do, which support family it belongs to, and when it deserves priority in a real Temple setup.
| Room | Primary Role | Important Support | Use It When |
|---|---|---|---|
| Generator | Coverage and upgrade enabler | Golem Works and rooms that need powered support | You need a flexible foundation before deciding the final reward path |
| Spymaster | Meta-scaling for several physical or military-style rooms | Garrison, Commander, Armoury, Smithy, Legion Barracks | Your Temple already has multiple rooms that benefit from broad effect scaling |
| Golem Works | Second meta-scaling family | Generator, Synthflesh Lab, Flesh Surgeon, Transcendent Barracks, Alchemy Lab | You are building XP, Alchemy, or Generator-heavy layouts |
| Thaumaturge | Specialist scaling and upgrade support | Corruption Chamber, Sealed Vault, Sacrificial Chamber, Alchemy Lab | Your Temple leans into corruption, sacrifice, or broad rarity choices |
| Smithy | Chest-value anchor | Spymaster and Generator-related support | You want a reliable loot-value room that is easy to justify in economy setups |
| Alchemy Lab | Broad item-rarity value | Thaumaturge for upgrades, Golem Works for effect scaling | You want stable general farming value rather than a narrower corruption payoff |
| Corruption Chamber | Rare-monster pressure and corruption utility | Thaumaturge and Sacrificial Chamber | You specifically want corruption value and can support a specialist chain |
| Synthflesh Lab | Experience bonus | Golem Works, Generator, Garrison | Your goal is leveling and your build can convert density into safe XP |
| Garrison | Monster pack flow | Commander, Armoury, Spymaster | You want more monsters for XP, loot flow, or rare-scaling plans |
| Sacrificial Chamber | Rare chest value and sacrifice chain | Thaumaturge and Corruption Chamber | You understand the cost of sacrificing adjacent rooms and can protect key rooms |
The table also shows why a second generic guide page would not be useful. The correct answer changes depending on the room family. For example, Alchemy Lab and Corruption Chamber are both loot-adjacent, but one fits broad farming more naturally while the other becomes stronger when the Temple already supports a specialist corruption chain.
PoE2 Temple upgrade chains by goal
Upgrade chains are the part of Temple planning that newer players usually feel rather than name. A room looks promising, then the run starts to feel awkward because the support rooms are far away, missing, or pointed at a different goal. This section turns that hidden problem into a checklist.
| Goal | Core Chain | Support Priority | Avoid |
|---|---|---|---|
| Currency and broad loot | Smithy + Alchemy Lab + Spymaster + Thaumaturge | Keep key rooms reachable before pushing luxury upgrades | Adding corruption-only rooms before the broad loot core is stable |
| XP and leveling | Synthflesh Lab + Garrison + Golem Works + Generator | Make sure the build can clear the extra density safely | Building density without enough clear speed or path control |
| Corruption focus | Corruption Chamber + Sacrificial Chamber + Thaumaturge | Protect the chain and avoid random sacrifices that break the plan | Choosing corruption only because it sounds exciting |
| Boss or unique focus | Flesh Surgeon + Corruption Chamber + Thaumaturge | Balance encounter value with survivability and path stability | Treating boss focus like a general loot layout |
| Balanced progression | Generator + one value room + one scaling room + one density room | Keep the Temple adaptable until the room offers become clear | Forcing a perfect advanced chain too early |
For most players, the balanced chain is the best default because it does not demand perfection. Start with a Generator or another practical support piece, add one clear reward direction, then use Spymaster, Golem Works, or Thaumaturge only when the surrounding rooms make them worth the slot.
Open the planner
Test whether the upgrade chain remains connected after you place the real rooms.
Read the full Temple guide
Review the complete room database, mechanics, and upgrade rules when you need more detail.
Compare best layouts
Use the layout article when you want a full farming-goal comparison instead of a quick chart.
How to set up a PoE2 Temple in 5 steps
Searchers asking how to set up Temple PoE2 usually need an order of operations, not another room encyclopedia. The safest order is simple: reveal the real shape, protect access, choose one chain, reinforce that chain, and only then optimize the final rewards.
- Reveal the useful room skeleton. Do not decide the whole plan from one room offer.
- Protect the main path. Valuable rooms need to be reachable, not just upgraded on paper.
- Choose one primary chain: currency, XP, corruption, boss focus, or balanced progression.
- Place support rooms where they help multiple important rooms rather than one isolated fantasy room.
- Spend late upgrades on the rooms that already define the Temple instead of starting a new direction.
A practical example: if the Temple gives you early Generator coverage and an Alchemy Lab, a broad loot setup is usually easier to defend than a sudden corruption setup. If it gives you Corruption Chamber plus Thaumaturge support, then the corruption path becomes more reasonable. The point is not to chase the strongest room in isolation. The point is to follow the strongest chain your Temple is already offering.
Do not overbuild the first plan
A plan made after two room decisions is a draft. Keep it flexible until you know whether the Temple can actually support the chain you want.
Compare Corruption Chamber and Alchemy Lab
Use this room comparison if your setup decision comes down to broad rarity versus corruption-focused value.
Open the planner
Sketch both choices and check whether the support chain and pathing still work.
Generator coverage: the quiet rule behind many good setups
Generator is easy to underrate because it does not always look like the reward room. In practice, it often decides whether the rest of the Temple can become coherent. A good Generator position turns several rooms from ideas into reachable upgrade paths. A bad Generator position forces you to spend the rest of the run patching problems you could have prevented early.
| Check | Good Sign | Bad Sign |
|---|---|---|
| Coverage | One Generator helps several planned rooms | Generator only supports one low-value side room |
| Pathing | Powered rooms stay near the route you intend to run | The powered cluster is disconnected from your reward path |
| Flexibility | Coverage lets you pivot between loot and XP support | Coverage locks you into a chain you no longer want |
| Upgrade timing | Generator is placed before late luxury upgrades | Generator is added after the layout is already cramped |
This is why the planner is useful even when you already understand the room list. The question is not just whether Generator is good. The question is whether this Generator placement helps this Temple. Use the visual grid to check actual coverage instead of trusting a mental sketch.
Best beginner default setup when you are unsure
When unsure, build a forgiving Temple rather than an ambitious one. The beginner default is Generator, one clear value room, one density or support room, and clean access. That sounds modest, but it teaches the right habits: define the goal, protect the route, and support the rooms that actually matter.
| Slot | Recommended Choice | Reason |
|---|---|---|
| Foundation | Generator | Keeps multiple upgrade paths available |
| Value room | Smithy or Alchemy Lab | Gives clear general farming value without requiring a perfect specialist chain |
| Scaling room | Spymaster, Golem Works, or Thaumaturge | Only choose the one that matches your existing room family |
| Flow room | Garrison or similar density support | Adds run tempo and can support XP or loot flow |
| Safety rule | Keep premium rooms connected | Access usually matters more than a theoretical final tier |
This setup is not meant to be the highest possible ceiling. It is meant to be hard to ruin. Once you are comfortable with it, move from the cheat sheet to the best layouts article and choose a more specialized direction for currency, XP, or boss farming.
Common PoE2 Temple setup mistakes
Most Temple failures are not caused by missing one secret room. They come from small planning errors that compound over the run. The same room can look good in a finished screenshot and still be wrong for the Temple you are actually building.
- Chasing Tier 3 before confirming the room is reachable.
- Mixing currency, XP, corruption, and boss goals in one cramped layout.
- Choosing a meta-scaling room without enough rooms for it to scale.
- Adding Corruption Chamber to a Temple that has no corruption support chain.
- Ignoring Generator coverage until support rooms are already misplaced.
- Copying a best layout without adapting to the rooms your Temple actually offered.
- Treating a room connection table as a final answer instead of a starting point for planner testing.
The fix is consistent: simplify the goal, protect the path, and ask what chain your current Temple can complete. If the answer is unclear, open the planner and compare two versions before spending the next upgrade.
Chaos, corruption, and room-connection search fixes
Some players search for phrases like PoE2 caos temple room connections when they mean chaos-value, corruption, or general Temple connection advice. Treat that as a quick diagnostic: if the search is about value, start with Smithy and Alchemy Lab; if it is about corruption, check Thaumaturge and Sacrificial Chamber; if it is about pathing, open the planner before upgrading.
| Search wording | Likely intent | Use this section |
|---|---|---|
| chaos temple room connections | Currency or chaos-value pathing | Room connections and beginner default |
| corruption room chain | Specialist corruption setup | Upgrade chains |
| generator coverage | Powered support and range | Generator coverage |
| temple setup online | Interactive validation | Open the planner from the CTA |
Frequently asked questions
Sources and further reading
These references were used to keep the quick-reference advice aligned with current Temple behavior and player search intent.
- PoE2DB: Temple of Atziri - Reference for current Temple room names, effects, and upgrade-chain terminology.
- Path of Exile 2 patch notes 0.4.0c - Official source for Temple room modifier buffs and important Tier 3 room changes.
- Path of Exile 2 patch notes 0.4.0d - Official source for Temple UI improvements and clearer room-evaluation context.
- Community discussion: updated Temple cheat sheet - Community reference showing demand for concise Temple connection and setup summaries.
About the author
Elena Marlowe
Elena Marlowe writes Temple strategy content for PoE2 Temple Planner with a focus on readable decision frameworks, patch-aware room advice, and practical references players can use while planning a real run.
Check the chain, then test the layout
Use this cheat sheet to choose the room family, then open the planner to confirm pathing, Generator coverage, and final room placement before committing to the run.