Best PoE2 Temple Layouts: 5 Atziri Temple Setups for Currency, XP, and Boss Farming
A practical, source-reviewed guide to choosing the right Temple of Atziri setup for your goal, whether you want tradable value, cleaner leveling, a more deliberate boss plan, or simply a graceful all-rounder.
Written by
Elena Marlowe
ARPG editor and systems writer at PoE2 Temple Planner
Elena covers game systems with an editorial eye for clarity, playability, and the small quality-of-life details that matter when a farming plan meets real in-game friction.
Editorial standard
This article was prepared from official Path of Exile patch notes, current PoE2DB room data, the site's planner logic, and recent community discussion to reduce stale or pre-patch assumptions.
On this page
How this guide was built
I ranked these Temple setups by asking a simple editorial question: which layouts still feel good when real players sit down after work, make a few imperfect choices, and want a result they can feel? Each recommendation weighs room synergy, upgrade pressure, pathing resilience, patch-era temple flow, and whether the setup remains useful when the temple is strong but not immaculate.
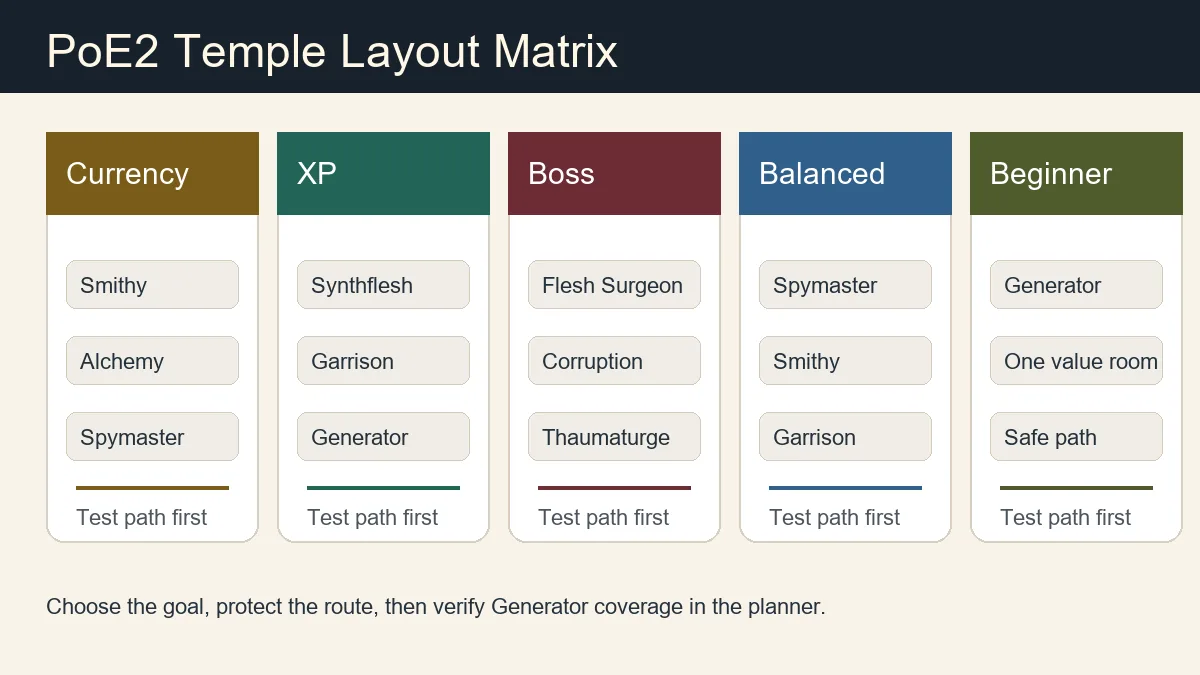
Quick comparison: the best PoE2 Temple layouts at a glance
If you only need the short answer, start here. These five layouts are not abstract theory pieces. They are practical build paths designed around the question players actually ask once they open the planner: what should I optimize for this run?
| Layout | Best For | Priority Rooms | Difficulty | Why It Wins |
|---|---|---|---|---|
| Currency Engine | Consistent loot value and tradable returns | Smithy, Alchemy Lab, Spymaster, Thaumaturge | Medium-High | Turns room scaling into broad loot quality and chest value |
| Experience Accelerator | Leveling and smooth monster density | Synthflesh Lab, Garrison, Workshop, Generator | Medium | Combines XP scaling with pack count and clean run tempo |
| Boss Hunter | Atziri attempts and unique-heavy encounter focus | Flesh Surgeon, Corruption Chamber, Thaumaturge | High | Pushes boss value without pretending every run is a loot sprint |
| Balanced Progression | General mapping value with low regret | Spymaster, Smithy, Garrison, Alchemy Lab, Generator | Medium | Gives profit, pace, and flexibility in the same frame |
| Beginner Stabilizer | Newer players and imperfect temples | Generator, Garrison, one value room, safe pathing | Low | Protects you from overcommitting to fragile upgrade chains |
How we ranked the layouts
Temple advice often sounds glamorous on paper. Every room is Tier 3, every path is elegant, every medallion lands perfectly, and the write-up quietly assumes that you never have to make an ugly compromise. That is not the standard I used here. The best layout in practice is the layout that survives ordinary play: an interrupted evening, a rushed map session, a bad sequence of room offers, or a temple that is strong but still visibly human.
So I scored each setup against five criteria. First, payoff clarity: does the layout produce a result you can feel quickly, such as more tradable loot, better XP pacing, or a more deliberate boss route? Second, upgrade pressure: how many moving parts must be perfect before the layout feels alive? Third, pathing resilience: can you still salvage the temple if connections or room offers are awkward? Fourth, planner usability: is the setup easy to model inside our planner and easy to explain to another player? Fifth, patch freshness: does the recommendation still make sense in the current Temple flow rather than in a launch-era memory of the mechanic?
- Payoff clarity: you should know exactly why you are running the layout.
- Upgrade pressure: a setup that only works in a perfect temple scores lower than one that works in an imperfect but realistic temple.
- Pathing resilience: valuable rooms must stay reachable and coherent.
- Planner friendliness: if a setup is hard to communicate, it is harder to execute.
- Patch relevance: post-update behavior matters, especially for room connectivity and temple flow.
E-E-A-T note
This guide does not present exact room values as official drop-rate promises. Where possible, recommendations are framed as practical strategy rather than unverifiable loot guarantees.
One more thing, and it matters. Searchers looking for the best PoE2 Temple layouts are usually not asking for a single universal answer. They are asking for the best answer for tonight. Maybe you are leveling a second character. Maybe you need reliable trade value. Maybe you finally want a cleaner boss-focused temple. A good article should respect that mood. A good planner should, too. That is why these five setups are written as decisions, not commandments.
Use the PoE2 Temple Planner before copying a layout
The safest way to use any layout guide is to test the idea inside the PoE2 Temple Planner before you treat it as a fixed script. A layout can look excellent on paper and still fail if your current temple shape leaves the key rooms disconnected, underpowered, or outside useful Generator coverage.
Open the PoE2 Temple Planner
Build the room core, switch to Ingame Logic, and export a shareable URL when the layout is reachable.
Read the full temple guide
Check room mechanics, upgrade requirements, Generator range, and common mistakes before committing.
Check room connections
Use the cheat sheet for upgrade chains, Generator coverage, and room relationship reminders.
Planner-first rule
If the planner shows that a premium room is isolated or unsupported, simplify the layout before chasing higher-tier upgrades.
1. The Currency Engine: best PoE2 Temple layout for loot value
If your primary goal is to turn temple time into saleable value, the Currency Engine is the layout to build around. It is the classic answer for players who want the Temple to feel like a serious farming lane rather than a side activity. The heart of the setup is not just one shiny room. It is the relationship between chest quality, broad item quality, and the scaling rooms that make your best value rooms feel sharper instead of merely present.
In practical terms, this means prioritizing Smithy, Alchemy Lab, Spymaster, and Thaumaturge, with enough support to keep the upgrade chain believable. Smithy is your cleanest chest-value lever. Alchemy Lab improves the overall quality of drops in a way that feels healthy across the whole run. Spymaster and Thaumaturge are where the layout graduates from decent to excellent because they improve the effect of other desirable rooms rather than asking you to commit to a single narrow reward lane.
The real beauty of this layout is that it rewards patience. It is not a glamorous sprint build, and it does not rely on one dramatic moment. Instead, it behaves like a well-edited magazine spread: every element is there to make the other elements look more expensive. When your support rooms are in place, the temple feels tidier, richer, and more coherent. Loot quality stops feeling random and starts feeling curated.
Priority plan
- Lock in a realistic path to Smithy and one scaling room early.
- Add Alchemy Lab if your temple shape allows it without breaking access.
- Favor Spymaster or Thaumaturge upgrades over weak side rooms that do not multiply value.
- Only stretch for luxury upgrades once your core rooms are both reachable and meaningfully upgraded.
| Room | Role in the layout | Why it matters |
|---|---|---|
| Smithy | Chest value anchor | Creates the most intuitive loot upgrade in the entire setup |
| Alchemy Lab | Broad item quality support | Helps the whole temple feel more rewarding rather than only one corner |
| Spymaster | Meta-scaling support | Makes other premium rooms better instead of duplicating mediocre value |
| Thaumaturge | Additional scaling for select rooms | Pushes specialized rooms upward when the temple is already stable |
The weakness of the Currency Engine is obvious, and worth stating clearly for trust. It can become too clever. Players often fall in love with the dream of a perfectly scaled economy temple and then overbuild around rooms they never secure or never connect properly. If your early temple is messy, treat this layout like a graceful aspiration, not a rigid doctrine. A stable Tier 2 economy temple is usually better than a broken Tier 3 fantasy.
Use this setup when you are trading actively, when your mapping build can clear a full temple smoothly, and when you care more about overall reward quality than about the absolute fastest run. If that sounds like your evening, the Currency Engine is still the strongest all-in profit layout on the board.
2. The Experience Accelerator: best layout for leveling and rhythm
Some temple guides talk about XP as if it is boring compared with loot. I do not agree. A good XP temple has its own kind of luxury. It feels smooth. It feels breathable. It gives you momentum. For many players, especially those pushing through awkward mid-to-late leveling stretches, an elegant experience layout is the difference between a grind and a genuinely satisfying play session.
The Experience Accelerator revolves around Synthflesh Lab, Garrison, Workshop, and enough Generator coverage to keep the whole arrangement operational. Synthflesh Lab is the obvious center of gravity. Garrison supports the layout by improving monster presence, which is what turns a sterile XP bonus into real experience gained over time. Workshop matters because good leveling layouts depend on support quality, not just one headline room. Generators remain the practical backbone, because without reliable coverage the whole thing starts to wobble.
What I like about this setup, both as an editor and as a player, is that it respects tempo. It does not merely ask whether a room is mathematically strong. It asks whether your temple stays fun while you are using it. More monsters, more coherent pull patterns, and a consistent sense of progression make the entire loop feel less brittle. That matters. Players do not always stick with the technically strongest setup. They stick with the one that feels alive.
Who should use it
- Players leveling an alt who want a temple that feels fast without becoming chaotic.
- Builds with strong clear speed that convert density into real XP instead of stress.
- Anyone who wants a layout that still has value even when the loot outcome is merely average.
The trade-off is that an XP temple rarely gives the same emotional thrill as a profit-first layout. If you judge every run by what you can list on trade afterward, you may find this setup too soft around the edges. But if you are honest about your current goal and your goal is levels, this is one of the cleanest answers in the pool. It is focused without being fragile.
| Question | If the answer is yes | If the answer is no |
|---|---|---|
| Do you care more about level progress than raw sale value? | Run the XP layout | Consider Balanced or Currency instead |
| Can your build clear dense rooms comfortably? | Lean into Garrison and Workshop support | Keep the layout simpler and safer |
| Is your temple pathing already stable? | Push for stronger support rooms | Fix reachability before chasing upgrades |
If you want a polished compromise between efficiency and comfort, this is my favorite layout to recommend. It is productive, but it also has manners.
3. The Boss Hunter: best PoE2 Temple layout for Atziri and harder encounters
Boss-focused temple advice often fails by pretending that bossing exists outside the rest of the temple. In reality, a boss layout still has to be traversed, upgraded, and emotionally justified. You do not want a temple that reads like a boss guide and plays like a chore. The Boss Hunter setup works because it accepts that you are building around meaningful encounters while still honoring the rest of the run.
The core rooms here are Flesh Surgeon, Corruption Chamber, and Thaumaturge, with support chosen to keep the temple honest rather than bloated. Flesh Surgeon supports unique-heavy targets. Corruption Chamber matters because encounter quality often scales with the kind of enemies and modifiers you are willing to deal with. Thaumaturge adds the supporting intelligence that a boss layout needs if it wants to be more than a narrow novelty.
This setup is ideal for players who are no longer asking, can I make the temple profitable at all, and are instead asking, how do I make the temple feel intentional when I care about difficult targets? It is a grown-up layout. It assumes your build is reasonably competent, your patience is decent, and your interest in the mechanic is deeper than one quick loot burst.
A boss layout should feel like a deliberate dinner reservation, not a rushed takeout order. Everything around the centerpiece should support the moment.
The cost of that intention is flexibility. Boss Hunter is not the first setup I would hand to a newer player, and it is not the setup I would recommend if your temple state is already scrappy. It asks more from your room quality and your execution. If connections are bad or upgrades are thin, the layout can feel underwhelming faster than the Currency Engine or Balanced Progression can.
When the Boss Hunter is the right call
- You want a layout that lines up with Atziri attempts or unique-focused temple value.
- Your build is sturdy enough that harder encounters do not ruin the run.
- You are comfortable giving up some broad farming convenience for higher encounter intention.
Think of Boss Hunter as a specialist wardrobe piece: exquisite when the occasion is correct, excessive when it is not. If you know that tonight is a boss night, it is worth wearing.
4. Balanced Progression: the best all-round PoE2 Temple layout for most players
If I could only recommend one layout to the largest number of searchers landing on this page, it would be Balanced Progression. Not because it is the flashiest, but because it makes the fewest dishonest promises. Balanced layouts age well. They survive mediocre luck. They tolerate imperfect routing. They leave you room to pivot. And perhaps most importantly, they keep the Temple fun even when your run is only good rather than extraordinary.
Balanced Progression usually starts from Spymaster, Smithy, Garrison, Alchemy Lab, and Generator as a practical spine. That mix creates a temple that can generate value, sustain decent monster flow, and still leave room for smarter late choices if the room offers turn generous. It is not a pure economy setup, not a pure XP setup, and not a pure boss setup. That is its charm. It is written for the player who wants a good answer to several questions at once.
This is also the layout where the planner shines brightest. Because the strategy is adaptable, you can use our planner to test several nearby versions without feeling that one deviation ruins the entire concept. That is exactly the kind of strategic elasticity players appreciate over time. A balanced layout does not only help you win one temple; it teaches you how to think about temple value in general.
Open the planner
Map out a balanced room core and test path changes before committing in game.
Read the temple guide
Review room basics, upgrade logic, and broader temple mechanics if you want more context.
| Strength | What it gives you |
|---|---|
| Flexibility | Lets you pivot toward loot, XP, or safer pathing depending on the rooms you actually see |
| Low regret | You are less likely to brick the temple by overcommitting too early |
| Good planner fit | Easy to model, explain, and share with friends |
| Stable value | Produces respectable outcomes even without a perfect room chain |
If you are unsure what to build, if your build is strong but not invincible, or if you simply want a temple that behaves beautifully in ordinary circumstances, Balanced Progression is the answer I trust most. It has range. And range, in a system this flexible, is real power.
5. The Beginner Stabilizer: a forgiving layout for newer or lower-confidence runs
The internet does not always write kindly for beginners. Too many guides assume that if you are reading about Temple layouts, you already know which support rooms matter, which upgrades are bait, and when an ambitious plan becomes self-sabotage. The Beginner Stabilizer is my answer to that problem. It is not a condescending layout. It is a generous one.
This setup begins by protecting the essentials: reliable Generator coverage, basic monster value through Garrison or another straightforward payoff room, and sensible pathing that keeps your important rooms reachable. After that, you choose one value direction and support it lightly. Not three directions. Not a dazzling web of future possibilities. One direction. The purpose of the Beginner Stabilizer is to teach clean decision-making, not to imitate the absolute ceiling of Temple optimization.
What makes this layout valuable is not raw output alone. It is confidence. When newer players understand why they are placing a room, they learn faster and waste less effort. They stop feeling like Temple planning is a private language spoken by someone else. That is a real strategic benefit, and frankly an underrated one.
Beginner rules worth keeping
- Secure access before chasing upgrades.
- Use one or two room goals, not five.
- Prioritize rooms you can actually explain to yourself in one sentence.
- If a layout looks brilliant but feels confusing, simplify it.
There is a grace to the Beginner Stabilizer that some advanced players forget. A temple does not have to be maximalist to be smart. Sometimes the best setup is simply the one that gets finished, understood, and enjoyed. If you are still learning the rhythm of the mechanic, that is more than enough.
How to choose the right Temple layout for your next run
When readers search for the best PoE2 Temple layouts, they often hope one of the five options above will announce itself dramatically. In practice, layout choice is quieter than that. It usually comes down to three small questions. What do you actually need from this run? What kind of build are you bringing? And how stable is your current temple state?
If you need tradable value and your build clears comfortably, Currency Engine is the straightforward answer. If you care about levels, rhythm, and cleaner monster flow, choose Experience Accelerator. If you are prepared and want more encounter intention, choose Boss Hunter. If you are uncertain, Balanced Progression is the most trustworthy default. If your temple is messy or your confidence is lower, Beginner Stabilizer is often the smartest move, not the weakest one.
| Your current goal | Recommended layout |
|---|---|
| I want the best chance at broad loot value | Currency Engine |
| I want a Temple that helps me level efficiently | Experience Accelerator |
| I care about stronger encounter focus and boss value | Boss Hunter |
| I want one safe answer that covers most situations | Balanced Progression |
| I am still learning and do not want to brick the run | Beginner Stabilizer |
A final editorial rule that I genuinely use myself: choose the layout you can still defend after a slightly imperfect temple. If a strategy only feels good when everything is perfect, it is a fragile recommendation. Strong strategy should survive real life.
Patch-specific tips, medallions, and pathing notes that still matter
Any article about the Temple needs one foot in current reality. Official patch notes in early 2026 changed several details around temple flow and room information, including clearer chamber connectivity and the fact that Temple Destabilisation no longer happens automatically after each run. That sounds like a small administrative note, but it changes the feel of the mechanic. When players rely on older videos, they can end up making planning mistakes for reasons that are not their fault.
The practical takeaway is simple. Read your temple state carefully, do not assume outdated friction points still exist, and let the current UI do some of the explanation work for you. If a room is valuable, make sure it is not only upgraded but also meaningfully connected. If you are using medallions, spend them where they protect the shape of the temple, not just where they feel exciting in isolation.
- Use tier-increase medallions to reinforce your actual core, not vanity rooms.
- Use protection or reroll tools to save layouts that are already coherent, not to rescue hopeless sprawl.
- Treat pathing as part of value. A premium room you cannot reach cleanly is not premium in practice.
- After a strong run, be deliberate about closing or continuing the Temple rather than clicking on habit.
A small but important trust note
Community discussion is useful for texture, but official patch notes should outrank anecdotal memory whenever the two disagree.
If you like community pulse checks, it is still worth watching how players on Reddit talk about room feel and routing, especially after updates. Just remember that the most vivid anecdote is not always the most reliable general rule. Inspiration is lovely. Verification is better.
Common mistakes that make good Temple layouts underperform
The difference between a good temple plan and a disappointing temple result is often not a secret high-level trick. More often, it is one of a handful of ordinary mistakes repeated with confidence. That is actually good news, because ordinary mistakes are fixable.
- Overbuilding too early. Players chase a dream layout before securing reachability and baseline support.
- Confusing interesting rooms with useful rooms. A room can be exciting and still be wrong for your goal.
- Ignoring build fit. A dense XP layout is only good if your character can comfortably clear it.
- Treating medallions like ornaments. Their best use is often structural, not decorative.
- Copying an advanced layout without understanding why each room belongs there.
- Reading outdated Temple advice and missing current patch behavior.
My favorite correction for almost every one of these mistakes is wonderfully unglamorous: pause and simplify. Ask what the Temple is for. Ask which two rooms matter most. Ask whether the path still makes sense. It is not a dramatic method, but it is effective. Beautiful systems usually reward calm choices.
Console and new season layout checks
Similarweb shows players also search for console-friendly Temple builds and new-season layout choices. The safe answer is not a separate console build; it is a layout that can be read quickly, exported, and followed without constant tab switching.
| Question | Best answer | Why it matters |
|---|---|---|
| Playing on console? | Use Balanced Progression or Beginner Stabilizer first | The plan stays readable without fast browser switching. |
| New economy unknown? | Start with broad currency or balanced value | Specialist corruption plans need more market confidence. |
| Weak early build? | Avoid dense XP plans until clear speed is comfortable | A layout only pays off if the character can run it safely. |
| Returning from an old guide? | Check Generator and pathing before copying | Patch-era Temple flow and room offers may change the practical route. |
Frequently asked questions
Sources and further reading
To keep this page aligned with current Temple behavior, I used official and high-context sources, plus one community discussion link for player sentiment.
- Path of Exile official patch notes 0.4.0d - Dofollow source used for temple-flow updates, UI changes, and chamber connectivity context.
- PoE2DB: Atziri's Temple - Reference for current room, upgrade, and Temple-system terminology.
- r/PathOfExile2 community discussions - Nofollow source included as a community pulse check, not as the primary authority.
About the author
Elena Marlowe
Elena Marlowe writes strategy features for PoE2 Temple Planner with a magazine-style focus on clarity, decision-making, and reader trust. She prefers guides that explain not just what works, but why it still works when a real play session gets messy.
Plan your own Temple before the next run
If you want to test one of these five setups, compare room trade-offs, or sketch a cleaner path to Atziri, use the planner first and then cross-check your choices with the main guide.